Hello and welcome to The Compost Bin. I'm Compostwoman and I live with my family in rural Herefordshire. We have nearly four acres of garden and woodland, all managed organically and to Permaculture principles, which we share with Chickens, Cats and assorted wildlife. We also grow a lot of our own food, run courses in all sorts of things and make a lot of compost!

I am a Master Composter and have spent more than a decade as a volunteer Community Compost adviser with Garden Organic and my local Council.
I'm a self employed Environmental Educator so I run workshops and events where I talk about compost, veg growing, chicken keeping, cooking, preserving and sustainable living. I also run crafts workshops and Forest School/outdoor play sessions in our wood.

We try to live a more self sufficient lifestyle here, as best we can, while still having a comfortable life and lots of fun.


To learn more about us click on the About Compostwoman tab and remember to click on the photos to make them full size!


Monday 28 February 2011

Growing Parsnips


Although Parsnips can withstand cold weather, they are notoriously slow to germinate and in practice I have found it better to wait and sow in March when it is warmer.

Parsnips like rich, slightly heavy soil, well dug but NOT recently manured (as, like carrots, they will fork if the soil is TOO rich)

As soon as you can dig the bed over and produce a fine tilth, the conditions are fine for planting parsnip seed in the ground ( if the weather allows you to get a fine tilth, its warm and dry enough!)

Parsnips take a long time to grow BUT you can get a worthwhile crop even if they are sown in late spring. MAKE SURE you use fresh this year seed, because parsnip seeds do not keep well. If you HAVE to use last years seed, pre sprout it to check for viability ( put on damp kitchen paper and watch it sprout, then snip the paper up so a bit has a sprouted seed on it and then plant the paper)


Follow the instruction on the seed packet about how/where to sow, and you may as well be generous as the seed doesn't keep well....

I plant some outside but at least half of my parsnips are planted in loo roll tubes

Lightly cover the seeds with more growing medium and water well.

Transplant into their final position in the ground AS SOON as the seed has germinated ...If you leave it too long the tap root emerges from the bottom of the tube and, when transplanted, may be damaged. This won't hurt the plant BUT you will get a smaller, forked root!


So, make sure you have the parsnip bed ready for planting, if you decide to follow the "tube" idea!

Saturday 26 February 2011

Growing tomatoes, peppers and aubergines.


(This is a revised version of a post I first published in 2009 on how I plant seeds and things)

As I said in my last post I have been planting seeds in the porch recently. Raising plants to transplant outdoors (or under cloches or in a greenhouse/ tunnel) gives you a head start on the season. It is simple to provide extra warmth for a few pots and trays of seeds - in a warm room, or on a heated bench for example.

But remember - the seedlings that appear will also need some warmth and good light levels, until they can be moved to a frost free final position, so allow for where you are going to keep them. This is especially the case with pepper, tomato and aubergine plants as they will need a warm place to live!

I have had a lot of success with putting moderate sized tomato plants inside a cold frame inside an unheated polytunnel during March/April and this would work just as well inside a conservatory or a plastic small greenhouse I think.

I have recently been sowing tomatoes, sweet peppers and aubergine (egg plant for US friends) seeds in modules which have been germinating in my heated propagators in the porch. The porch is double glazed but unheated so can get cold at night! It is west facing though so gets the sun in the afternoon and makes a good place to set up "mission control" seed growing central!


I now have 3 electric heated propagators, each of which will hold 4 of the 6 celled seed modules. I have slowly gathered these over the last 20 years, they ARE expensive and I had two as gifts and the third was a sale bargain as it had a slightly damaged lid (!) BUT they are invaluable to me to help raise early plants, as I do not (YET) have a greenhouse to do this in. ( I have a greenhouse in BITS, and have had it for 8 years but it is not yet put together in a usable condition..maybe next year?)

I sow the sweet peppers and aubergine seeds first as they take longer to germinate than tomatoes (the peppers especially) I usually can move the seedlings out of the heated propagators and into unheated mini greenhouse trays after 15 days or so, and then I can sow more seeds in modules and put them in the empty space in the propagator...

I also sow herbs and salad seeds in unheated mini greenhouse windowsill trays and they give me an early start to the summer salads!

I do have salads over winter in the polytunnel BUT we don't tend to want to eat much salad in the winter in our household!


Sweet Pepper seeds


Sow on surface of growing medium them cover with about as much growing medium as the length of the seed.


Label


Water


and place in heated propagator,


seed germinated in 9 days...if in unheated propagator ( tray with some sort of cover) it will take longer...)


I have been sowing recently inside in my heated propagator in the same way as the pepper seeds, tomato, hot pepper and aubergine (egg plant)seeds.


Tomatoes/Peppers/Aubergines - for growing on in a cold greenhouse or tunnel (NOT OUTSIDE!!)
sown during the Feb waxing moon.

Wednesday 23 February 2011

Starting off the seeds 2011 - Peppers, tomatoes, okra.

I have spent some time last week planting seeds in the heated propagators.

But I have just  realised I have  planted at least one 6 cell tray of 15 different varieties of  Tomato and 10 different pepper varieties, as well as Okra and all sorts of other stuff! Haven't even started on the Cucumbers , yet.... Or the Cherry tomato varieties....

The seeds are all in heated propagators in a double glazed large porch, so effectively are in a greenhouse, and will go into cold frames inside the PT until all danger of frost is passed, then will be planted out inside the Polytunnel.

It is how I do it every year, but I seem to have planted a lot more, a bit earlier, this year!

Good job I have advance orders for some of the plants! Also think I may be selling some plants at the gate again this year Very Happy

Friday 18 February 2011

Some things I have been up to recently...


Admiring the Snowdrops


and the Crocuses.


Felling trees and pruning shrubs and burning the bits which are no good as firewood.


And staying out until it is dark, so I can gaze into the flames!

Saturday 5 February 2011

Making twig hearts


Dogwood (Cornus alba) comes in both red and green stemmed versions which make an outstanding display in the winter. The green leaves turn red or orange in autumn before falling and displaying the brightly coloured bare stems. Dogwood bends very easily and the bright colour and straightness of the twigs makes it useful in crafts, especially for making wreaths and baskets. I use it in my craft workshops to make wreath bases at Christmas and to make twig stars, wands and heart shapes at any time of the year. Willow is also a good choice of material.


How to make a twig heart.

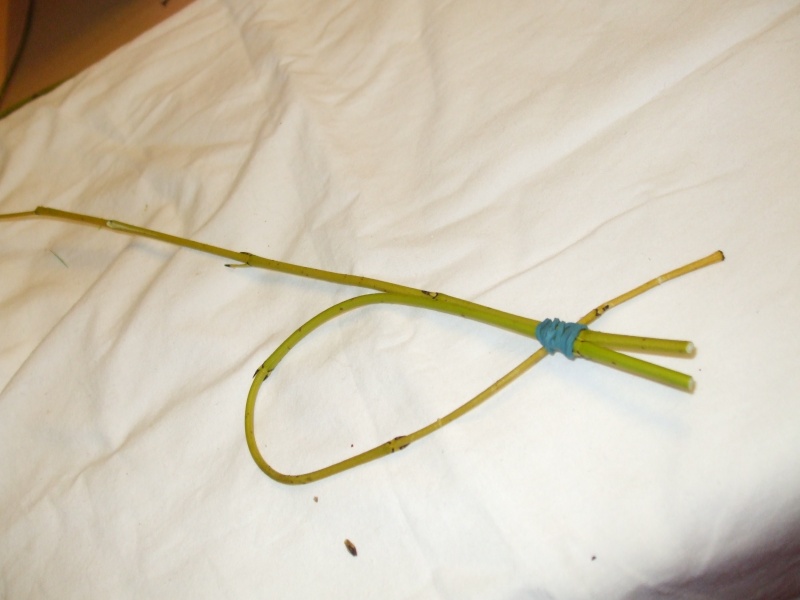
1. Take 2 twigs of roughly the same length (around 30cm or longer).

2. Fasten them together at the bottom, thickest end. (Using an elastic band first makes it easier to tie them )

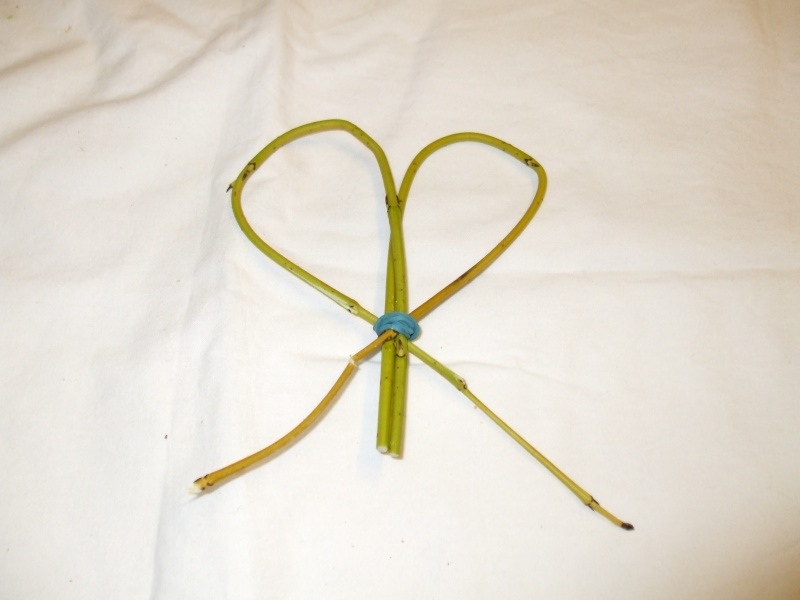
3. Take 1 of the twigs and bend it part way along, and down. This is the curve of the heart and sets the size of heart you will make. Fasten the thin end into the elastic band holding the thick ends of the twigs together.


4. Take the other twig and bend it part way along, and down in the same way, fastening the thin end into the elastic band holding the thick ends of the twigs together.


5. You now should have a heart shape!

6. Adjust the shape of the heart until it is how you want it, then tie the thick and thinner ends together with your choice of ribbon or raffia. Trim the ends of the twigs to your desired length


Variations

1. Take 2 bundles of 3 twigs, all roughly the same length. A mix of green and red is very effective.

2. Tie them together at the bottom, thickest end. (Use an elastic band first, to make it easier)

3. Take 1 of the twig bundles, plait the 3 twigs in that bundle before continuing as above in step 3.

4. Repeat the plaiting for the other twig bundle, before continuing as above in step 4.

5. You now should have a heart shape, with each half made of the 3 twigs plaited together.

6. Adjust the shape of the heart until it is how you want it, then tie the thick and thinner ends together with your choice of ribbon or raffia.

OR just use 2 bundles of equal length dogwood and make a heart as if using 2 twigs.

Friday 4 February 2011

Visit to the Scrapstore


I had a trip to the Scrapstore in Worcester ltoday, with Compostman. I am running various recycled material based craft workshops over the next few months, so I needed to stock up on supplies.

The Worcestershire Resource Exchange ( aka Scrapstore) is very well run, clean, tidy, well thought out and with loads of really good items for the bargin price of a trolley load for £10 ish, if you are a member. membership is worth while if you go more than once or twice a year!

I got lots of lovely card making supplies, also a raffia weaving kit that is excellent and will be great for craft workshops, lots of art supplies, some cross stitch kits and oven baked clay making kits, some big wool carpet samples which are ideal as rugs in 3 places we need to buy rugs for, and Compostman got lots of wire and a 6 ' length of slotted angle.

All this wonderousness for £22. The raffia kit alone was £5, reduced from £40 online.

I estimate that, if I had bought all of it from a craft supplier, it would have cost me in excess of £150.

If you have a Scrapstore nearby, I recomend using it!

On a sadder note, Treacle the hen is injured again and sitting down when she tries to walk....
UA-40361266-1