Snow, ice, bloomin, blasted stuff....Well Bah Humbug, is all I can say...
Am shattered here after a very cold day. Life with livestock, even if only hens, gets to be so much more work with ice or snow. AND I also have numerous small pets in hutches outside to sort out now, so that adds in extra time...
Dunno how people I know with serious levels of livestock are coping but everything takes as least twice as long, what with more feed needed, thawing out water, keeping it liquid etc....
It was - 10 C overnight so we had all 3 cats piled on us all night - they couldn't even be bothered to fight! And ice on inside of our bedroom window glass this morning...brrrr it never got above -5 here all day, which is seriously cold for November in the UK Midlands. Normally we do not get this sort of weather for another 2 months and I am a bit worried about the stored crops in the garage shelves....so I went off to check for frost damage to the pumpkins etc.
The poor hens hate it like this, the ground is just too cold for them, I have put down another pallet for them to stand on as they hate the ground this cold....they go all pathetic looking and stand on one leg.
We are also ripping up the sitting room concrete floor now so all is mess and disruption in the house as well which adds in a lot of work!!
Still if the weather stays bad, we have heat, a generator, a woodburner, lots of food for at least 4 weeks of normal-ish diet etc ...and that includes animal food, fuel for cars etc....so it might actually be sort of OK-ish!
I am writing this now in the early evening because I have finally finished outside chores, which I have had to re do 3 extra times today as food, water needs re doing due to cold. Now all is done, frozen things thawed or drained down, stored veg wrapped up a bit more, cider wrapped up in bubble wrap to stop it freezing, small pets given extra hay , food, fresh water and their houses covered over etc etc .
So I can sit, and have a hot cup of tea and contemplate watching "Sweeny Todd" later on the TV, a rather gory film I think but it DOES have Johnny Depp in it... I think I deserve a treat after today!
Sunday, 28 November 2010
Saturday, 27 November 2010
New member of the small pets gang

This is Crystal. She is a Dwarf lop rabbit who is about a year old. She joined us from a local small animal rescue charity and is to be a companion for Peter Rabbit.
Rabbit introductions can be easy but can also be fraught with difficulty, sometimes even a buck and doe will hate the sight of each other and NEVER make friends, so we took Peter over to the rescue place and let him and Crystal met up first. When they didn't try to kill one another, we brought Crystal home and she and Peter rapidly settled down together.

This is them in the kitchen, having a bit of a feed. They are sharing a big hutch and are now very happy together.
I am feeling pleased as I now have sorted out the small animals being lonely issue! Fudge the Guinea Pig has two male companions, Chalky and Snowy, to keep him company and he is a much happier looking and sounding little piggy as a result. And now Peter Rabbit has a friend as well.
Friday, 26 November 2010
Winter eggspectations....
I have seen a number of forum posters and bloggers recently, writing about their hens not laying in the winter. I must admit I feel everso slightly smug as yet again my feathery ladies are still laying and I fully eggspect them to carry on through the winter...
My 12 hens are still laying! 4 are in moult, the other 8 potentially laying hens are laying 6-7 eggs a day. A few of my hens are year old -ish, rest are 2 years old ish and the moulty ones are 3-4 year old-ish plus
I count my blessings every day when I go out to them. I think an egg is a miracle of nature, despite knowing the science and biology which causes it to be laid!
So, what do I do with my girls to keep them laying? I am giving them hot mash at about 9 am which is made of layers pellets and hot water with various extra stuff added, poultry spice or marmite or garlic powder or natural yogurt on different days just to make it more interesting. I do this first thing in the morning, then they have dry pellets ad lib all day as is usual.
I also make sure I give them their corn ration at about 2 pm, so they have space to fill up their crops again with pellets before bed time, as I found if they had the corn too late they didn't eat any more pellets. The layers pellets contain everything hens need to be healthy and to lay eggs but tbh probably get a bit boring for a bird whose natural habit is to scratch around on the jungle floor eating all sorts of stuff. Which is why I try to give them a bit of variety in their diet! BUT it is important that they eat a final crop full of layers pellets before bed time as that is what helps to make the next days lot of eggs.
The hens also go out in the wood for an hour or so as well between 2 ish and 4 ish (if the weather is OK) otherwise they are in their paddock which is pretty huge anyway and I make sure they have lots of stuff in the paddock (grass mowings, wood chippings, leaf piles) to scratch around in and find stuff to eat.
This all seems to be working and my regime means I get eggs all winter from the girls...maybe a few less in Jan and Feb but still I would eggspect 6 eggs a day from the flock of 12, which allows for my flock containing old hens/young hens/off lay hens.
and no, I do not use any artificial lighting as I personally do not agree with tinkering with my hens natural body clock...but that is just me and if others want to that is up to them...
Thursday, 25 November 2010
Random photographs of what I have been up to

Covering over the fallow parts of the veg plot with geo textile,

Teaching craft courses

Clearing out our sitting room so it can be gutted and insulated and all sorts of stuff done to it by lovely Compostman

Trying to restore some order to the other rooms in the house, which have had to absorb a lot of extra stuff from the sitting room!

Fending off the hens from my chard patch!

Admiring some fabulous sunsets
Wednesday, 24 November 2010
My how she has grown!


Cassi kitten has been with us for two months now and how she has grown!
She is the loveliest cat, very affectionate and plays mad games of chase with Compostgirl around the kitchen. She is still a little nervous of going outside, but has ventured out especially if we come too.
She is settling in with Tom and Tabitha now and mostly they ignore each other, or exchange nose sniffs, but the major fighting has stopped thank goodness!
Tuesday, 23 November 2010
Craft suppliers
I use a variety of suppliers for my various crafting needs, I get a lot of stuff from my local Scrapstore, but I do buy new as well. So here are some suppliers I use.
Making stuff, ideas
- http://www.allfreecrafts.com/
- http://www.enchantedlearning.com/
- http://www.essortment.com/family.html
Suppliers of craft stuff such as raffia, fabrics
- http://www.tts-group.co.uk/
- http://www.westmerciasupplies.co.uk
- http://www.yellowmoon.org.uk/
- http://www.bagnboxman.co.uk/
- http://www.theessentialscompany.co.uk
- http://www.calicocrafts.co.uk/
Monday, 22 November 2010
Twig stars
Dogwood (Cornus alba) comes in both red and green stemmed versions which make an outstanding display in the winter. The green leaves turn red or orange in autumn before falling and displaying the brightly coloured bare stems. Dogwood bends very easily and the bright colour and straightness of the twigs makes it useful in crafts, especially for making wreaths and baskets. I use it in my craft workshops to make wreath bases at Christmas and to make twig stars, wands and heart shapes at any time of the year. Willow is also a good choice of material.
How to make twig stars or star wands
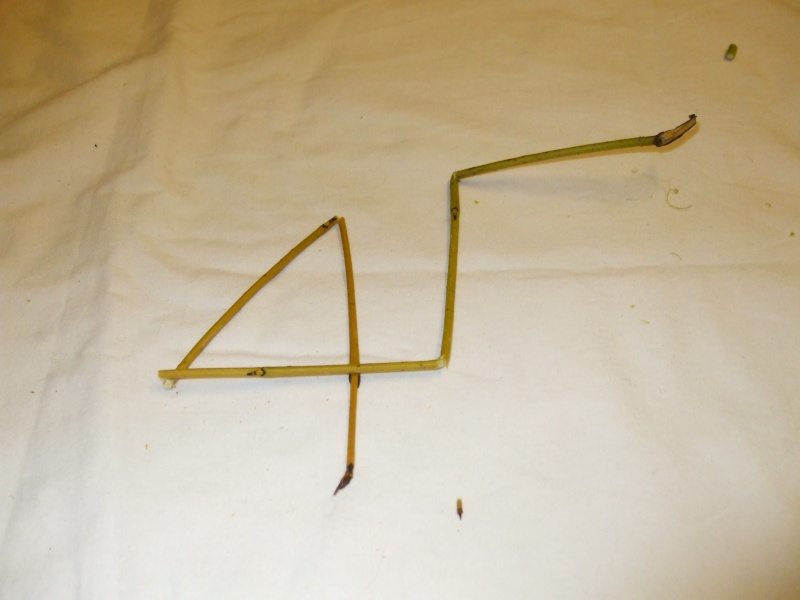
1. Take a straight flexible twig and, working back from the tip, bend the twig about 15cm from the end. Then go back along the twig from this bend about 10 cm and bend it again.
2. Repeat measuring 10 cm backwards towards the thicker end and bending the twig 2 more times. Take care that the twig doesn’t snap while you work.
3. You should now have a twig divided up into 4 equal lengths and one slightly longer length at the very thinnest end.
4. Make a “4” shape with the first bends.
Enlarge this imageReduce this image Click to see fullsize
5. Fold the rest of the bent twig back across the “four” to make a 5-pointed star.
Enlarge this imageReduce this image Click to see fullsize

Weave the fine end in and out to create the star structure. Wind the fine end around the thicker stem and tie together with raffia or ribbon.
Enlarge this imageReduce this image Click to see fullsize

6. If you can find a really long straight twig, make the star at the thinner end and you will have made a wand!

_________________
How to make twig stars or star wands
1. Take a straight flexible twig and, working back from the tip, bend the twig about 15cm from the end. Then go back along the twig from this bend about 10 cm and bend it again.
2. Repeat measuring 10 cm backwards towards the thicker end and bending the twig 2 more times. Take care that the twig doesn’t snap while you work.
3. You should now have a twig divided up into 4 equal lengths and one slightly longer length at the very thinnest end.
4. Make a “4” shape with the first bends.
Enlarge this imageReduce this image Click to see fullsize
5. Fold the rest of the bent twig back across the “four” to make a 5-pointed star.
Enlarge this imageReduce this image Click to see fullsize
Weave the fine end in and out to create the star structure. Wind the fine end around the thicker stem and tie together with raffia or ribbon.
Enlarge this imageReduce this image Click to see fullsize
6. If you can find a really long straight twig, make the star at the thinner end and you will have made a wand!
_________________
Sunday, 21 November 2010
Making twig hearts
Dogwood (Cornus alba) comes in both red and green stemmed versions which make an outstanding display in the winter. The green leaves turn red or orange in autumn before falling and displaying the brightly coloured bare stems. Dogwood bends very easily and the bright colour and straightness of the twigs makes it useful in crafts, especially for making wreaths and baskets. I use it in my craft workshops to make wreath bases at Christmas and to make twig stars, wands and heart shapes at any time of the year. Willow is also a good choice of material.
How to make a twig heart.
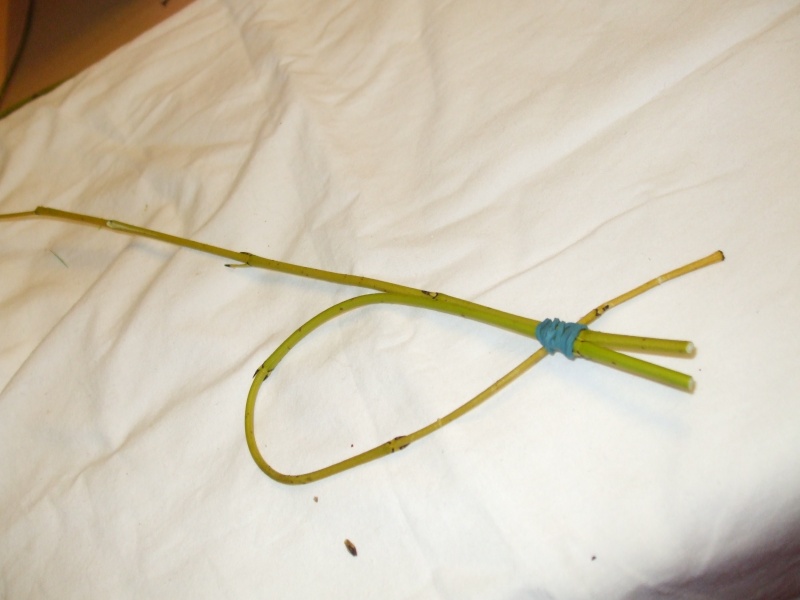
1. Take 2 twigs of roughly the same length (around 30cm or longer).
2. Fasten them together at the bottom, thickest end. (Using an elastic band first makes it easier to tie them )
3. Take 1 of the twigs and bend it part way along, and down. This is the curve of the heart and sets the size of heart you will make. Fasten the thin end into the elastic band holding the thick ends of the twigs together.
Enlarge this imageReduce this image Click to see fullsize
4. Take the other twig and bend it part way along, and down in the same way, fastening the thin end into the elastic band holding the thick ends of the twigs together.
Enlarge this imageReduce this image Click to see fullsize
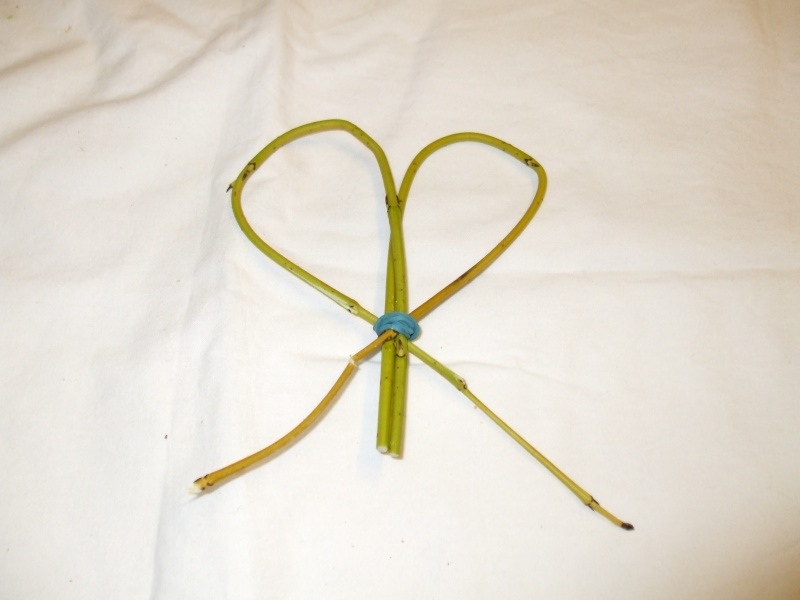
5. You now should have a heart shape!
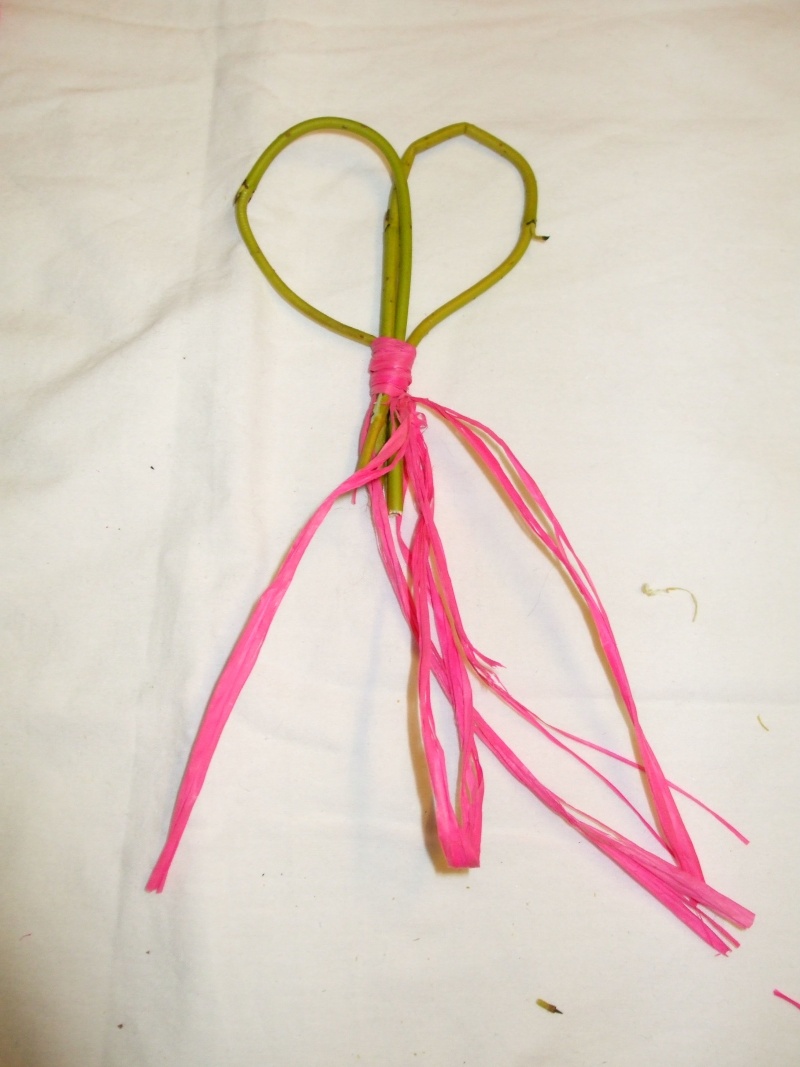
6. Adjust the shape of the heart until it is how you want it, then tie the thick and thinner ends together with your choice of ribbon or raffia. Trim the ends of the twigs to your desired length
Enlarge this imageReduce this image Click to see fullsize
Variations
1. Take 2 bundles of 3 twigs, all roughly the same length. A mix of green and red is very effective.
2. Tie them together at the bottom, thickest end. (Use an elastic band first, to make it easier)
3. Take 1 of the twig bundles, plait the 3 twigs in that bundle before continuing as above in step 3.
4. Repeat the plaiting for the other twig bundle, before continuing as above in step 4.
5. You now should have a heart shape, with each half made of the 3 twigs plaited together.
6. Adjust the shape of the heart until it is how you want it, then tie the thick and thinner ends together with your choice of ribbon or raffia.
OR just use 2 bundles of equal length dogwood and make a heart as if using 2 twigs.

How to make a twig heart.
1. Take 2 twigs of roughly the same length (around 30cm or longer).
2. Fasten them together at the bottom, thickest end. (Using an elastic band first makes it easier to tie them )
3. Take 1 of the twigs and bend it part way along, and down. This is the curve of the heart and sets the size of heart you will make. Fasten the thin end into the elastic band holding the thick ends of the twigs together.
Enlarge this imageReduce this image Click to see fullsize
4. Take the other twig and bend it part way along, and down in the same way, fastening the thin end into the elastic band holding the thick ends of the twigs together.
Enlarge this imageReduce this image Click to see fullsize
5. You now should have a heart shape!
6. Adjust the shape of the heart until it is how you want it, then tie the thick and thinner ends together with your choice of ribbon or raffia. Trim the ends of the twigs to your desired length
Enlarge this imageReduce this image Click to see fullsize
Variations
1. Take 2 bundles of 3 twigs, all roughly the same length. A mix of green and red is very effective.
2. Tie them together at the bottom, thickest end. (Use an elastic band first, to make it easier)
3. Take 1 of the twig bundles, plait the 3 twigs in that bundle before continuing as above in step 3.
4. Repeat the plaiting for the other twig bundle, before continuing as above in step 4.
5. You now should have a heart shape, with each half made of the 3 twigs plaited together.
6. Adjust the shape of the heart until it is how you want it, then tie the thick and thinner ends together with your choice of ribbon or raffia.
OR just use 2 bundles of equal length dogwood and make a heart as if using 2 twigs.
Saturday, 20 November 2010
Salt dough crafts
Salt dough crafts
The art of making objects using salt dough has become very popular in recent years with the only requirements to get started in this folk art hobby are flour, salt, water and basic equipment found in the kitchen. This is how I do it and how I teach others to do it at my craft workshops
Things you need
a baking tray (covered with a thin layer of butter/oil to stop the decorations sticking)
paints and brushes (you can mix the paints with some pva glue)
a cocktail stick (for making the hole in the decorations)
A bowl to mix your dough
A rolling pin for producing smooth sheets of dough
Toothpicks or a small pointed knife for cutting and indenting details
An assortment of pastry cutters and moulds for decorative shapes
Basic Salt Dough
2 Cups of Plain Flour (not self-raising)
1 cup Fine grained plain salt
1/2 cup water at room temperature
Veg oil ( opt.)
Mix the salt and flour in a large bowl and then add the water. Knead the mixture for about 5-10 minutes until it becomes smooth and elastic. (The addition of 1-2 teaspoons of vegetable oil improves suppleness of the dough making it easier to work with). Cover with cling wrap to stop the dough drying out and let the dough sit for 30 minutes before using.
The dough is now ready to use. Fresh dough is best for modelling. However, if you find you have any leftover dough it can be wrapped in cling wrap or an airtight container and stored in a cool place for a few days.
When finished and happy with your results you can air-dry or bake your project in the oven.
MAKE SURE YOU MAKE A HOLE IF YOU WANT TO HANG IT UP!!
Ensuring your projects are correctly dried ensures they will last a long time so it is important that this is not hurried. Air-drying is suitable for flat, small pieces or for coloured pieces where baking will alter the colour of the finished project. Oven drying is the most popular method and requires careful attention to accurate temperature control to avoid burning. Bake for approx. 2 hours using a low temperature setting 50-70C for the first half hour then increase temperature slowly to 90-100C and cook until the piece is uniform in colour.
The dough is cooked when it hard and sounds hollow when tapped. Turn the oven off and leave in oven until cool. Any burns can be sandpapered off with fine- medium grade sandpaper. An emery board or small file can be used for delicate or intricate sanding on objects.
When thoroughly dry sand any imperfections. At this stage you can paint your projects then seal with a final coat of varnish. Your finished projects can be left unpainted but they must be sealed on all sides (including underneath) with varnish, gloss or matt, for protection otherwise they will not last long when exposed to air.
Using a polyurethane varnish on food coloured models instead of water- based varnish helps to intensify the colour.
Also, for the more impatient or short of time...
Microwave Salt Dough recipe
4 cups of flour
1 cup of salt
1-1/2 cups of hot water
Directions:
Roll the dough thinly. Using a microwave-safe plate (not paper or cardboard), microwave a plate of your ornaments for 1 to 4 minutes, increasing the time by 1 minute increments and keeping a close eye on the microwave as the ornaments bake. Suggestions are to cook on High, but I have found medium or low, and slowly, gives the best result. Too rapid baking causes the objects to bubble up and distort. You also don't want to risk a fire! Let the ornaments cool completely before decorating, as before.
I have tried both of these recipies, the microwave one didn't work for me at all.
After making and drying out.
Enlarge this imageReduce this image Click to see fullsize

After painting with acrylic paint, seen hanging on our tree.
Enlarge this imageReduce this image Click to see fullsize

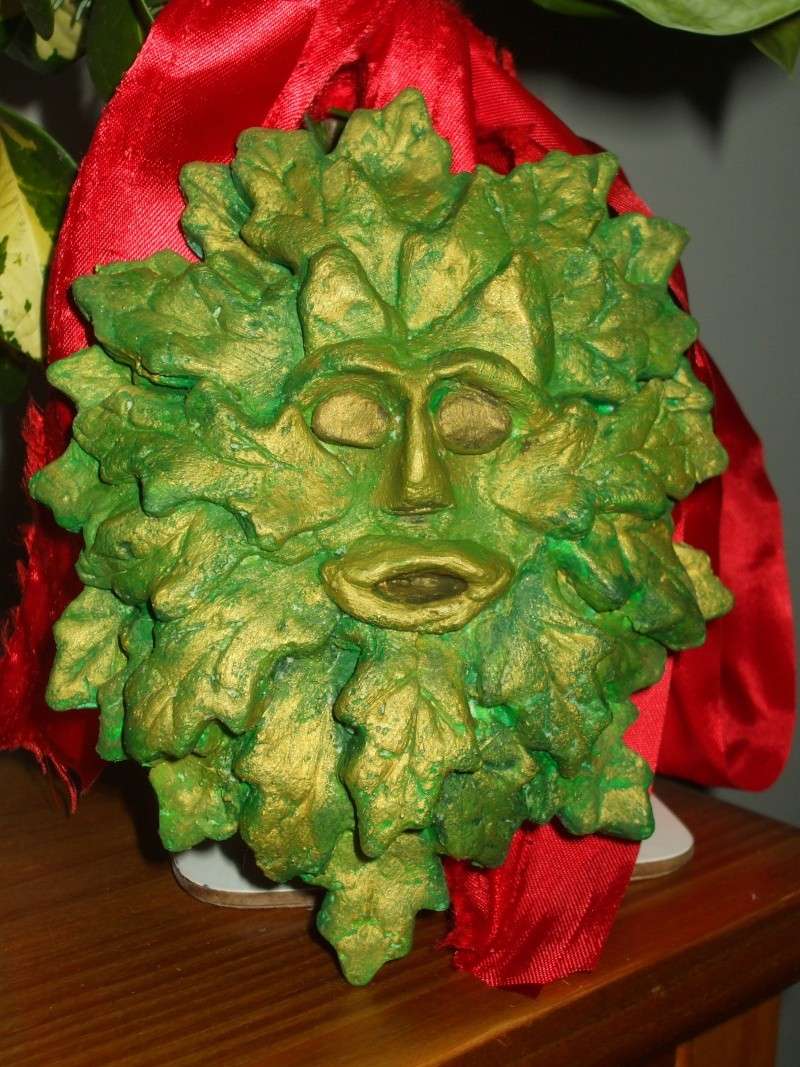
A Green Man I made last year.
Enlarge this imageReduce this image Click to see fullsize
The art of making objects using salt dough has become very popular in recent years with the only requirements to get started in this folk art hobby are flour, salt, water and basic equipment found in the kitchen. This is how I do it and how I teach others to do it at my craft workshops
Things you need
a baking tray (covered with a thin layer of butter/oil to stop the decorations sticking)
paints and brushes (you can mix the paints with some pva glue)
a cocktail stick (for making the hole in the decorations)
A bowl to mix your dough
A rolling pin for producing smooth sheets of dough
Toothpicks or a small pointed knife for cutting and indenting details
An assortment of pastry cutters and moulds for decorative shapes
Basic Salt Dough
2 Cups of Plain Flour (not self-raising)
1 cup Fine grained plain salt
1/2 cup water at room temperature
Veg oil ( opt.)
Mix the salt and flour in a large bowl and then add the water. Knead the mixture for about 5-10 minutes until it becomes smooth and elastic. (The addition of 1-2 teaspoons of vegetable oil improves suppleness of the dough making it easier to work with). Cover with cling wrap to stop the dough drying out and let the dough sit for 30 minutes before using.
The dough is now ready to use. Fresh dough is best for modelling. However, if you find you have any leftover dough it can be wrapped in cling wrap or an airtight container and stored in a cool place for a few days.
When finished and happy with your results you can air-dry or bake your project in the oven.
MAKE SURE YOU MAKE A HOLE IF YOU WANT TO HANG IT UP!!
Ensuring your projects are correctly dried ensures they will last a long time so it is important that this is not hurried. Air-drying is suitable for flat, small pieces or for coloured pieces where baking will alter the colour of the finished project. Oven drying is the most popular method and requires careful attention to accurate temperature control to avoid burning. Bake for approx. 2 hours using a low temperature setting 50-70C for the first half hour then increase temperature slowly to 90-100C and cook until the piece is uniform in colour.
The dough is cooked when it hard and sounds hollow when tapped. Turn the oven off and leave in oven until cool. Any burns can be sandpapered off with fine- medium grade sandpaper. An emery board or small file can be used for delicate or intricate sanding on objects.
When thoroughly dry sand any imperfections. At this stage you can paint your projects then seal with a final coat of varnish. Your finished projects can be left unpainted but they must be sealed on all sides (including underneath) with varnish, gloss or matt, for protection otherwise they will not last long when exposed to air.
Using a polyurethane varnish on food coloured models instead of water- based varnish helps to intensify the colour.
Also, for the more impatient or short of time...
Microwave Salt Dough recipe
4 cups of flour
1 cup of salt
1-1/2 cups of hot water
Directions:
Roll the dough thinly. Using a microwave-safe plate (not paper or cardboard), microwave a plate of your ornaments for 1 to 4 minutes, increasing the time by 1 minute increments and keeping a close eye on the microwave as the ornaments bake. Suggestions are to cook on High, but I have found medium or low, and slowly, gives the best result. Too rapid baking causes the objects to bubble up and distort. You also don't want to risk a fire! Let the ornaments cool completely before decorating, as before.
I have tried both of these recipies, the microwave one didn't work for me at all.
After making and drying out.
Enlarge this imageReduce this image Click to see fullsize
After painting with acrylic paint, seen hanging on our tree.
Enlarge this imageReduce this image Click to see fullsize
A Green Man I made last year.
Enlarge this imageReduce this image Click to see fullsize
_________________
Friday, 19 November 2010

Thursday, 18 November 2010
What do I do with all this compost?
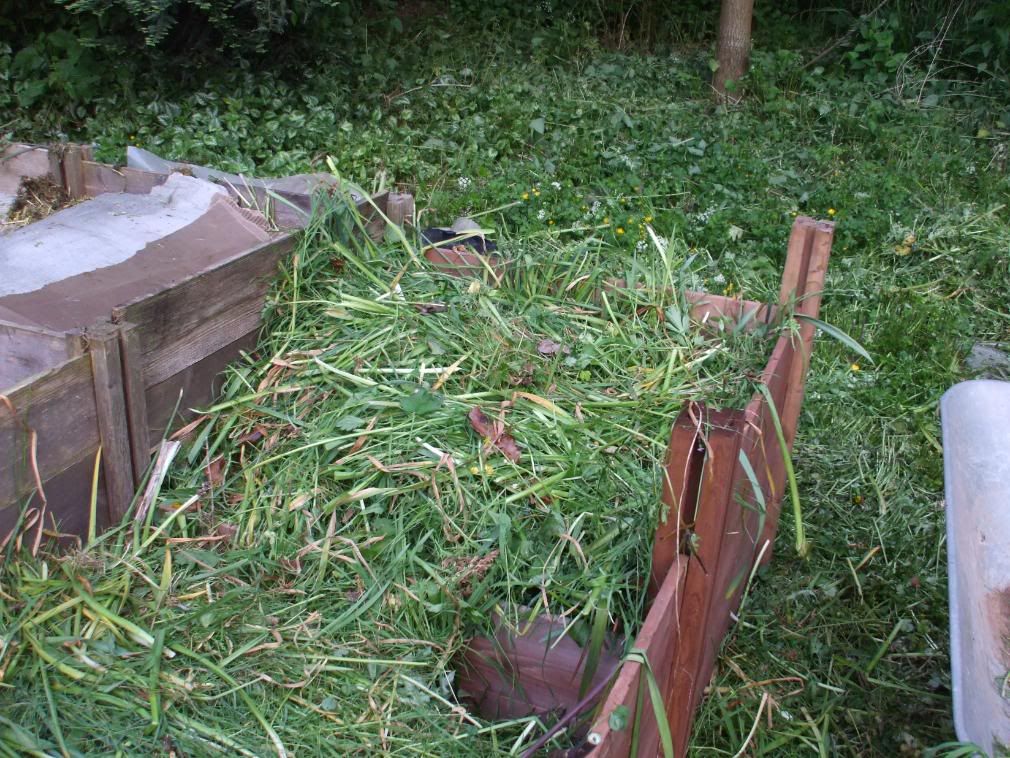
So, after my last compost post you should all have an idea how make good compost (assuming you didn't, already :-)) )and all the things you could be putting in to make it work really well....
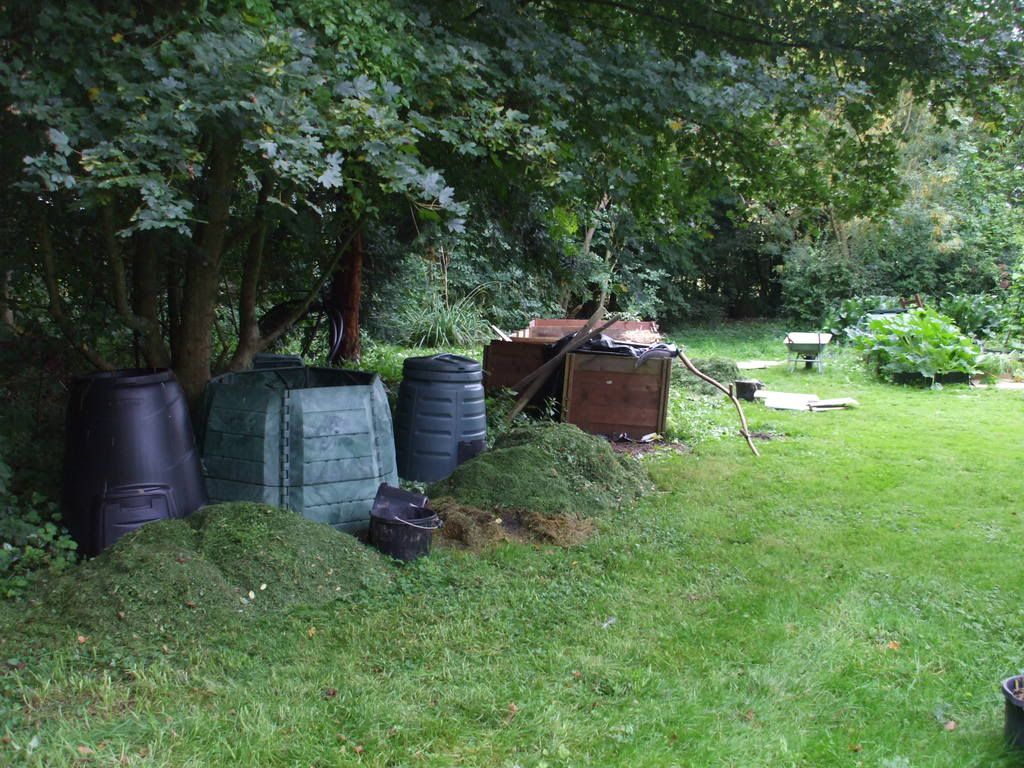
I removed the wooden slats from one of the bins the other day, to see how my friends the worms and insects and microbes were getting on with composting...and see what I found! Decomposing stuff up the top and then a beautiful layer of freshly made compost all the way down to the bottom of the box. Ah, the magic of compost. Throw in stuff which is waste and get out for free a valuable resource, which you would otherwise have to pay for!

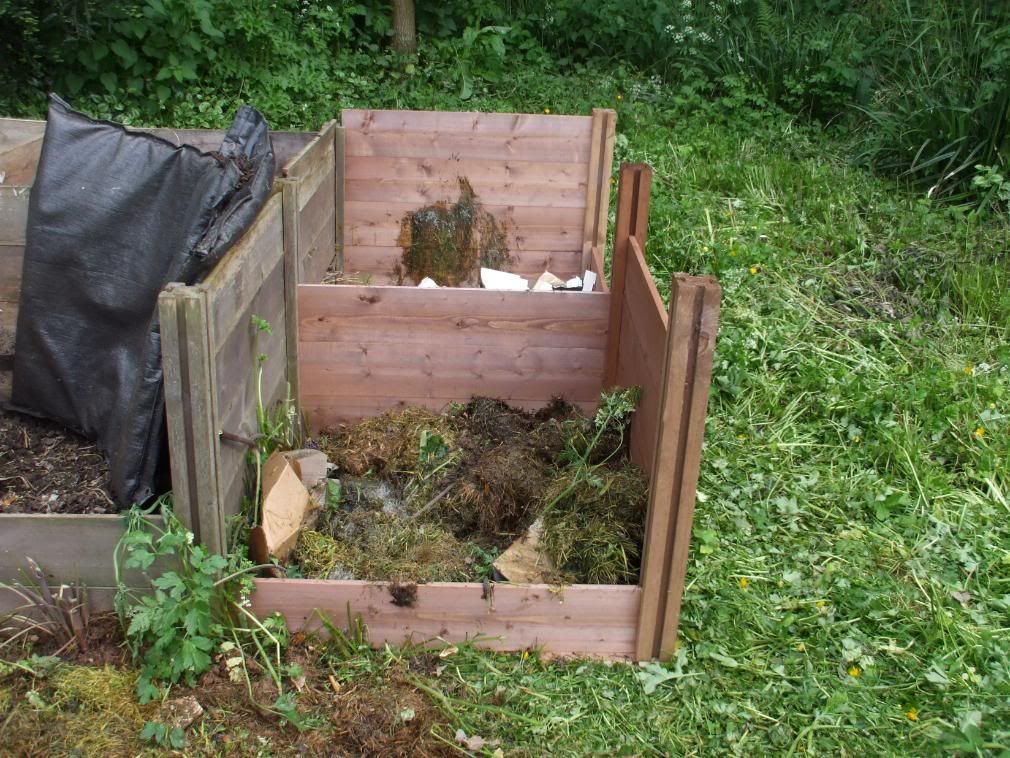
But how do you tell when it is ready? And what do you do with it when it is ready in the bin, like this?
Well, your compost is ready when it looks dark brown and soil like and smells nice and earthy. It should also be slightly moist and have a crumbly texture.
It probably won't look like the compost (growing medium) you buy in the shops and yours will still maybe have twigs and eggshell in it but don't worry... it's still perfectly good to use and you can simply sieve out any larger bits and return them to your compost bin.
So, dig it out and if you can, leave it to mature for a month or two, as fresh compost can "scorch" soft plants if used immediately.
Your lovely compost is food for your garden and will help improve the soil structure, maintain moisture levels and keep your soils pH balance in check while helping to suppress plant disease. Compost has everything your plants need, including nitrogen, phosphorous and potassium, it improves your soil's condition and your plants and flowers will love it ( and you for giving them it!)
 The compost at the bottom is ready. It looks like soil, smells sweet and has few "bits" left undecomposed in it. There may be egg shells and bits of twig left ( and corks!) but apart from that it has all turned into wonderful, rich compost.
Using your compost in the veg garden
Use about 1 wheelbarrow load per 5 sq m, applied in the spring and summer. Dig it in to the top 15 cms or leave it as a surface mulch. I apply my home made compost at a depth of about 3 cm on the soil but I have lots to spare. I often also put some on the autumn after lifting crops, I then cover with cardboard or geotextile and let the earthworms drag it down into the soil for me.
I also use a generous layer of my home made compost in the bottom of potato and bean trenches.
If you don't have enough compost to do all the veg patch, concentrate on the potato, bean, curcubit and green leafy veg areas. As part of a crop rotation your whole patch will eventually get some compost.
Another experiment in progress! As you know I make a LOT of compost...so I use these raised beds to put it in , grow in it and then at the end of the season put the spent compost on the veg garden and start again with filling the empty raised beds next spring.

SO...this bed has lots of lovely home made compost in it and I am using it to grow early spuds.
One advantage of doing this is that IF your compost still has weed seeds left, you can see them as they germinate and simply hoe or pull them out....
I also grow the indoor tomatos and peppers and aubergines in large pots standing in trays inside the Polytunnel. The reason being that the polytunnel (erected by the previous owners, not us!) was sited on a load of subsoil and rubble dug out from when the garage was built...so the ground is NOT suitable to grow directly into! Even *I* can't work any kind of miracle with it....
I use builders buckets with holes drilled in the base as large pots and plant into them, it works very well, and then the compost also goes on the veg garden at the end of the growing season.
I now grow exclusively in my own compost, in 2008 I experimented to see if my home made growing medium was as good as commercial peat free potting mix, and I found MY mix gave me earlier and better yields from the same sowings of the same varieties with identical treatment...so I now only buy in growing medium to sow seeds into. Once they are plants I will transplant them into my home made growing medium , of compost : loam: sand.

In addition to making all this compost in bins I use lots of cardboard/paper to cover my plot when the soil is bare, to stop loss of precious nutrients and to provide some organic material as it rots down...I mulch directly with grass cuttings on fallow soil, and plant green manures WHEREVER I can to promote fertility and add humus to the soil.....
Other ideas for using your home made compost.
If you have plants in pots outdoors you could top dress the soil with a layer of home made compost. Take off the top few centimetres of existing soil and add your home compost. Leave a gap around soft stemmed plants. This will give your plants food and is a great way to make them more healthy.
Dressing your lawn with compost helps young grass take root and can make your garden healthier and greener. First, sieve the compost and remove any large twigs or other bits that have not quite broken down. Then mix it with the same amount of sharp sand : compost (to spread it more easily). You will need a layer of about 2.5cm. I use a stiff broom to brush it into the grass. Mature lawns can really benefit from this dose of nutrients but be careful as newly seeded or turfed lawns can be scorched by it.
Compost is great for your fruit trees and they will be very happy if you spread a thick layer of home made compost around the roots of the tree, as will any soft fruit trees. A 5-10cm layer around the roots will provide important nutrients and can protect against drought and disease. Avoid the base of the tree and do not spread too close to the trunk. This will also suppress weeds growing around them. Doing this once or twice a year will help your trees grow taller and bushier.
Using your compost as mulch is a great idea. Use your 'rough' compost (where not everything has completely broken down) over flowerbeds and around shrubs to help prevent soil erosion and replenish nutrients. Use a layer of 5cm, leave a gap around any soft stemmed plants and if you do this after rain or watering, you will help keep the moisture in the soil.
Digging a 10cm layer of compost into the soil prior to planting will help your new plants and flowers bloom. If you have already planted, simply spread a thin layer of compost-enriched soil around the base of the plants. Nutrients will work their way down to the roots. Remember to leave gaps around any soft stemmed plants.
Spread up to a 5cm layer of compost over your boarders to give them a feed! Earthworms will quickly like get to work mixing it in for you, or you can dig your finished compost into the soil prior to planting. Remember to leave gaps around any soft stemmed plants.
So, I hope this has given you some ideas for things to do with your home made compost and you will all be spreading your compost soon. After all just THINK of all the money saved by making your own soil improver and potting mix!
Also, just think of all the waste diverted from going into Landfill if you compost...think of all the Methane which our waste is NOT producing in the Landfill! Methane is 23 times more potent a greenhouse gas than Carbon Dioxide, remember!
And hopefully you will all have even better crops as a result of using your lovely home made compost.
For more ideas on composting, go here, or here,
Happy Composting :-)
I removed the wooden slats from one of the bins the other day, to see how my friends the worms and insects and microbes were getting on with composting...and see what I found! Decomposing stuff up the top and then a beautiful layer of freshly made compost all the way down to the bottom of the box. Ah, the magic of compost. Throw in stuff which is waste and get out for free a valuable resource, which you would otherwise have to pay for!

But how do you tell when it is ready? And what do you do with it when it is ready in the bin, like this?
Well, your compost is ready when it looks dark brown and soil like and smells nice and earthy. It should also be slightly moist and have a crumbly texture.
It probably won't look like the compost (growing medium) you buy in the shops and yours will still maybe have twigs and eggshell in it but don't worry... it's still perfectly good to use and you can simply sieve out any larger bits and return them to your compost bin.
So, dig it out and if you can, leave it to mature for a month or two, as fresh compost can "scorch" soft plants if used immediately.
Your lovely compost is food for your garden and will help improve the soil structure, maintain moisture levels and keep your soils pH balance in check while helping to suppress plant disease. Compost has everything your plants need, including nitrogen, phosphorous and potassium, it improves your soil's condition and your plants and flowers will love it ( and you for giving them it!)
 The compost at the bottom is ready. It looks like soil, smells sweet and has few "bits" left undecomposed in it. There may be egg shells and bits of twig left ( and corks!) but apart from that it has all turned into wonderful, rich compost.
Using your compost in the veg garden
Use about 1 wheelbarrow load per 5 sq m, applied in the spring and summer. Dig it in to the top 15 cms or leave it as a surface mulch. I apply my home made compost at a depth of about 3 cm on the soil but I have lots to spare. I often also put some on the autumn after lifting crops, I then cover with cardboard or geotextile and let the earthworms drag it down into the soil for me.
I also use a generous layer of my home made compost in the bottom of potato and bean trenches.
If you don't have enough compost to do all the veg patch, concentrate on the potato, bean, curcubit and green leafy veg areas. As part of a crop rotation your whole patch will eventually get some compost.
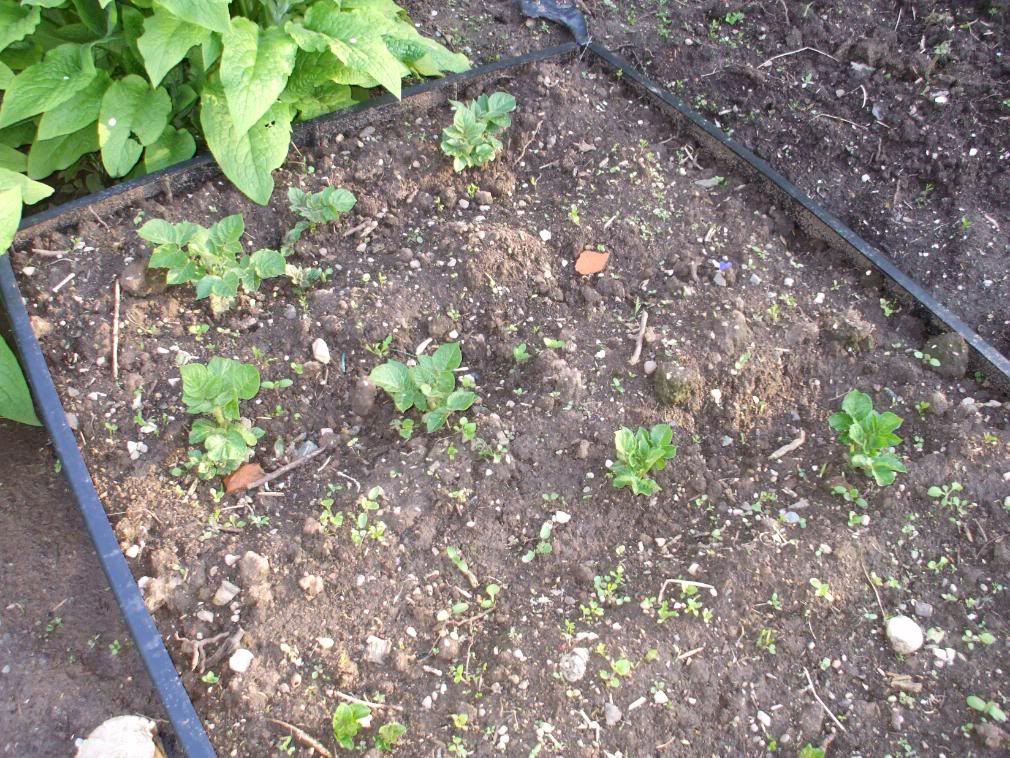
Another experiment in progress! As you know I make a LOT of compost...so I use these raised beds to put it in , grow in it and then at the end of the season put the spent compost on the veg garden and start again with filling the empty raised beds next spring.

SO...this bed has lots of lovely home made compost in it and I am using it to grow early spuds.
One advantage of doing this is that IF your compost still has weed seeds left, you can see them as they germinate and simply hoe or pull them out....
I also grow the indoor tomatos and peppers and aubergines in large pots standing in trays inside the Polytunnel. The reason being that the polytunnel (erected by the previous owners, not us!) was sited on a load of subsoil and rubble dug out from when the garage was built...so the ground is NOT suitable to grow directly into! Even *I* can't work any kind of miracle with it....
I use builders buckets with holes drilled in the base as large pots and plant into them, it works very well, and then the compost also goes on the veg garden at the end of the growing season.
I now grow exclusively in my own compost, in 2008 I experimented to see if my home made growing medium was as good as commercial peat free potting mix, and I found MY mix gave me earlier and better yields from the same sowings of the same varieties with identical treatment...so I now only buy in growing medium to sow seeds into. Once they are plants I will transplant them into my home made growing medium , of compost : loam: sand.
In addition to making all this compost in bins I use lots of cardboard/paper to cover my plot when the soil is bare, to stop loss of precious nutrients and to provide some organic material as it rots down...I mulch directly with grass cuttings on fallow soil, and plant green manures WHEREVER I can to promote fertility and add humus to the soil.....
Other ideas for using your home made compost.
If you have plants in pots outdoors you could top dress the soil with a layer of home made compost. Take off the top few centimetres of existing soil and add your home compost. Leave a gap around soft stemmed plants. This will give your plants food and is a great way to make them more healthy.
Dressing your lawn with compost helps young grass take root and can make your garden healthier and greener. First, sieve the compost and remove any large twigs or other bits that have not quite broken down. Then mix it with the same amount of sharp sand : compost (to spread it more easily). You will need a layer of about 2.5cm. I use a stiff broom to brush it into the grass. Mature lawns can really benefit from this dose of nutrients but be careful as newly seeded or turfed lawns can be scorched by it.
Compost is great for your fruit trees and they will be very happy if you spread a thick layer of home made compost around the roots of the tree, as will any soft fruit trees. A 5-10cm layer around the roots will provide important nutrients and can protect against drought and disease. Avoid the base of the tree and do not spread too close to the trunk. This will also suppress weeds growing around them. Doing this once or twice a year will help your trees grow taller and bushier.
Using your compost as mulch is a great idea. Use your 'rough' compost (where not everything has completely broken down) over flowerbeds and around shrubs to help prevent soil erosion and replenish nutrients. Use a layer of 5cm, leave a gap around any soft stemmed plants and if you do this after rain or watering, you will help keep the moisture in the soil.
Digging a 10cm layer of compost into the soil prior to planting will help your new plants and flowers bloom. If you have already planted, simply spread a thin layer of compost-enriched soil around the base of the plants. Nutrients will work their way down to the roots. Remember to leave gaps around any soft stemmed plants.
Spread up to a 5cm layer of compost over your boarders to give them a feed! Earthworms will quickly like get to work mixing it in for you, or you can dig your finished compost into the soil prior to planting. Remember to leave gaps around any soft stemmed plants.
So, I hope this has given you some ideas for things to do with your home made compost and you will all be spreading your compost soon. After all just THINK of all the money saved by making your own soil improver and potting mix!
Also, just think of all the waste diverted from going into Landfill if you compost...think of all the Methane which our waste is NOT producing in the Landfill! Methane is 23 times more potent a greenhouse gas than Carbon Dioxide, remember!
And hopefully you will all have even better crops as a result of using your lovely home made compost.
For more ideas on composting, go here, or here,
Happy Composting :-)
Wednesday, 17 November 2010
First parsnips


This year I constructed a raised bed so as to have a greater depth of friable, enriched soil to grow them in.
We are on over 100 foot of solid clay here and the parsnips were really hard to dig out of it once they got thier roots down into the clay. I was fed up with losing the end of the parsnips so created the raised beds.
It seems to have worked!
Mmm parsnips, we love them!
Tuesday, 16 November 2010
How to make Leaf Mould
Autumn brings a carpet of leaves, which take a long time to compost. I have been recently making Leaf Mould (or Mold) from all the fallen leaves in our wood and garden. I used the ride on mower for some of the leaf gathering as we have SO many leaves to collect! I do, however, also gather some the traditional way, with a rake!


Why do I want to make leaf mould? Why do I not just leave the leaves where they fall?
Well, I DO leave the leaves in the wood where they can compost down as nature intended, and provide a wonderful home for all manner of insects, worms and small mammals as well as a rich and varied eco system of fungi and microbes.
BUT the leaves which fall on the grass will simply exclude light and damage the grass AND I want them to make a valuable resource in an organic gardener's repertoire of tricks, a fine, brown compost-like material, which can be used in the same way as compost.
It is very easy to make leaf mould. The best method is to gather large quantities of leaves and put them into a container and leave them to rot down. A wire enclosure or a black sack (with some holes for aeration) will work fine for this. It is best to collect the leaves when they are wet as this will help them to break down quicker, if they are dry, water them a little as you place them into the container.

Please note I use compost bins simply because I have some available!

Compostman squashing down the leaves so as to get more in the bin!

All that big pile of leaves gone into 2 compost bins.

Covered over and ready to leave for a year or so. These two bins will produce a little less than 1 bin of finished leaf mould compost
Leaves will take a year or two to decompose into a usable form. To speed up this process I mix the leaves with some grass cuttings (another reason to use the ride on mower!), this gives me a much richer leaf mould in about a year , due to the leaves being chopped up a bit and the grass clippings adding heat to the composting process.

The finished leaf mould can be used in a variety of ways, it can be used as a weed-suppressing and moisture-retaining mulch, dug in, spread over a lawn, sprinkled over seeds or for making potting compost. It will improve the physical structure of the soil and make it more fertile. Leaf mould is incredibly rich and nutritious and I have found is very good for using in an onion or shallot bed.

Digging out the 2008 leaf mould to use in a shallot bed. This has the happy advantage of freeing up compost bins to make this year's leaf mould.
So, next time you see some leaves in the Autumn, if you don't make leaf mould, have a go! Its a free way to get some wonderful organic matter into your soil and it is another step along the path to a more self sufficient/self reliant way of life.
Monday, 15 November 2010
Glass painting
Finished painting my candle jars yesterday. Will fill them with candle sometime this week. Am rather pleased with them
The one on the right which is just an outline is being filled with a coloured wax mix, the rest will probably be a single colour candle.
I did the butterflies from a template, free hand but based on a template in a glass book but the others were sort of generally out of my head.
probably derived from something I have seen though!


Took me ages to draw the shape on paper, so I could put it inside and then use the outliner paint...glass is a right so and so to paint on!
Compostman liked my colourful take on a Green Man best. I am in the middle of designing a "traditional" Green Man to transfer to a larger candle jar at the moment.
Sunday, 14 November 2010
Top tips to maximise how much compost you make.
As I have already mentioned in my previous posts on composting, we make a lot of compost here at Compost Mansions.
We compost as much stuff as we can, as we want to maximise the fertility of our land and what better way to put back the nutrients we have taken out by growing veg, than to compost the peelings, weeds, leaves from the plants and add the compost back to the soil.
We also don't want to generate any more greenhouses gases than we have to by sending putrecible waste to landfill, to sit there and generate Methane, which is more than 20 times worse a greenhouse gas than Carbon Dioxide.
By composting everything and anything available it is possible to dramatically increase the amount of compost you produce. But to get the best from the composting process it is important to know what can and can't go in the compost bin.
Remember, to get the ideal compost mix you will roughly need a 50:50 mix of both "green" (high Nitrogen) and "brown" (high Carbon) containing material in your bin.
So, here is a list of things which can be composted.
‘GREENS’
● Fruit scraps (including citrus peel)
● Spent bedding plants
● Rhubarb leaves
● Comfrey leaves
● Nettles
● Young annual weeds (e.g. chickweed and speedwell)
● Pond algae and seaweed (in moderation)
● Coffee grounds and filter paper
● Grass cuttings
● Manure (horse, cow, pig, sheep, goat, chicken, rabbit – not too much as could become too wet)
Human urine is a very good activator!
I stockpile various weeds and prunings and grass cuttings from the lawns, until I have a good quantity of raw materials to fill up the compost bins.
‘BROWNS’
● Tissues, paper towels and napkins (unless they have been in contact with
meat or disease)
● Tumble dryer lint (from natural fibre clothes)
● Old natural fibre clothes (e.g. woolly jumpers or cotton t-shirts
– make sure you cut them into small pieces)
● Vacuum bag contents(as long as you have natural fibre carpets)
● Garden prunings
● Toilet and kitchen roll tubes,
● Woody clippings
● Dry leaves, twigs and hedge clippings
● Human and pet hair (slow to break down)
● Cotton threads/String(made from natural fibres)
● Feathers
● Wool
● Newspaper(scrunched up)
● Shredded confidential documents
● Straw and hay
● Vegetarian pet bedding
● Ashes from wood, paper, or lumpwood charcoal
● Sawdust and wood chippings
● Corn cobs and stalks
● Cereal boxes
● Corrugated cardboard packaging (scrunched up in small amounts)
● Pine needles and cones (although slow to compost don’t put too much in)
● Egg shells (but crush them first to speed up composting)
● Egg boxes (good as they trap air)
I keep a few "browns" bins in the house which I use for all the little bitty bits of card, paper, tissue etc which is too scrappy to recycle, as well as a caddy for peelings, tea bags, coffee filters etc ec in the kitchen.
I am always on the lookout for cardboard sheets, from shops or from Freecycle.
I add the used wood based cat litter to a special bin, having first removed the cat faeces ( these can contain pathogens which might be harmful to humans) This bin also contains the roots from pernicious weeds ( dandelions, nettles etc) which I do not want to spread around the garden. I use the compost from this bin in the bottom of holes where trees are going to be planted or spread it under a hedge bottom.
If you have any other things you add to your bins, which are not on my list, why not leave a comment!
We compost as much stuff as we can, as we want to maximise the fertility of our land and what better way to put back the nutrients we have taken out by growing veg, than to compost the peelings, weeds, leaves from the plants and add the compost back to the soil.
We also don't want to generate any more greenhouses gases than we have to by sending putrecible waste to landfill, to sit there and generate Methane, which is more than 20 times worse a greenhouse gas than Carbon Dioxide.
By composting everything and anything available it is possible to dramatically increase the amount of compost you produce. But to get the best from the composting process it is important to know what can and can't go in the compost bin.
Remember, to get the ideal compost mix you will roughly need a 50:50 mix of both "green" (high Nitrogen) and "brown" (high Carbon) containing material in your bin.
So, here is a list of things which can be composted.
‘GREENS’
● Fruit scraps (including citrus peel)
● Vegetable peelings
● Tea bags
● Old flowers● Spent bedding plants
● Rhubarb leaves
● Comfrey leaves
● Nettles
● Young annual weeds (e.g. chickweed and speedwell)
● Pond algae and seaweed (in moderation)
● Coffee grounds and filter paper
● Grass cuttings
● Manure (horse, cow, pig, sheep, goat, chicken, rabbit – not too much as could become too wet)
Human urine is a very good activator!
I stockpile various weeds and prunings and grass cuttings from the lawns, until I have a good quantity of raw materials to fill up the compost bins.
‘BROWNS’
● Tissues, paper towels and napkins (unless they have been in contact with
meat or disease)
● Tumble dryer lint (from natural fibre clothes)
● Old natural fibre clothes (e.g. woolly jumpers or cotton t-shirts
– make sure you cut them into small pieces)
● Vacuum bag contents(as long as you have natural fibre carpets)
● Garden prunings
● Toilet and kitchen roll tubes,
● Woody clippings
● Dry leaves, twigs and hedge clippings
● Human and pet hair (slow to break down)
● Cotton threads/String(made from natural fibres)
● Feathers
● Wool
● Newspaper(scrunched up)
● Shredded confidential documents
● Straw and hay
● Vegetarian pet bedding
● Ashes from wood, paper, or lumpwood charcoal
● Sawdust and wood chippings
● Corn cobs and stalks
● Cereal boxes
● Corrugated cardboard packaging (scrunched up in small amounts)
● Pine needles and cones (although slow to compost don’t put too much in)
● Egg shells (but crush them first to speed up composting)
● Egg boxes (good as they trap air)
I keep a few "browns" bins in the house which I use for all the little bitty bits of card, paper, tissue etc which is too scrappy to recycle, as well as a caddy for peelings, tea bags, coffee filters etc ec in the kitchen.
I am always on the lookout for cardboard sheets, from shops or from Freecycle.
I add the used wood based cat litter to a special bin, having first removed the cat faeces ( these can contain pathogens which might be harmful to humans) This bin also contains the roots from pernicious weeds ( dandelions, nettles etc) which I do not want to spread around the garden. I use the compost from this bin in the bottom of holes where trees are going to be planted or spread it under a hedge bottom.
If you have any other things you add to your bins, which are not on my list, why not leave a comment!
Saturday, 13 November 2010
Walking in my wood
I love walking in fallen leaves.

No leaves left

Even the log circle clearing is bare.

I love this time of year.
Friday, 12 November 2010
Pumpkins - what to do with them?
I was asked yesterday what I do with all the pumpkins I grow. Here are just some of this year's harvest.


drizzle with oil and salt and pepper, roast in a hot oven (180- 200 C ish) for at least 20 mins then check to see if cooked...we often do a pumpkin for freezing at the same time as a roast dinner as the oven is already set to hot.

When the pumpkin is cooked, get it out and leave to cool until you can hold the slices.
Remove the skin as it is much easier to get off after the pumpkin has been cooked! I then cut the flesh into chunks, let it cool and open freeze it for bagging up later.
 To make soup I add the pumpkin flesh ( either raw or cooked) to sweated onion, garlic in a big pan, add stock, add herbs, bring to boil, simmer for 30 min or longer ( ie, until I remember it!) season to taste, leave to cool, blitz with chopper whizzer thingy,

I then portion it out , freeze some portions and keep some back to eat that night or for lunch...
Mmmm delish!
I wash the dirt off the pumpkins after harvest and carefully examine them for blemishes. Any which are damaged are put aside for "eating now". The rest are stored in a cool dark shed and will keep until next spring.
What we usually do with pumpkin is roast it and freeze it in chunks. This allows us to take out portions and eat "as is" as a vegetable, or use to make soups or sweet pie filling. Sometimes we eat it freshly cooked as well! We usually have at least one pumpkin cooked in the freezer, ready to use.
To roast the pumpkin, wash the outside, then slice into BIG slices leaving the skin on.

drizzle with oil and salt and pepper, roast in a hot oven (180- 200 C ish) for at least 20 mins then check to see if cooked...we often do a pumpkin for freezing at the same time as a roast dinner as the oven is already set to hot.

When the pumpkin is cooked, get it out and leave to cool until you can hold the slices.
Remove the skin as it is much easier to get off after the pumpkin has been cooked! I then cut the flesh into chunks, let it cool and open freeze it for bagging up later.


I then portion it out , freeze some portions and keep some back to eat that night or for lunch...
Mmmm delish!
Thursday, 11 November 2010
How I make compost


Compost can be made in a heap on the ground, but it is more efficient and tidier if you use a compost bin. You can get wooden or plastic bins from garden centres, or your local council may sell subsidised ones. A quick internet search for ‘DIY compost bin plans’ will also give you ideas for home made versions.
Composting requires a roughly 50:50 by volume mix of grass, weeds and vegetable peelings (called ‘greens’ in composting speak) which are high in Nitrogen; along with dry paper, straw and card (known as ‘browns’ in composting speak) which are high in Carbon.
Keep a container in the kitchen to collect vegetable peelings and save egg boxes, loo roll inners and other papers to turn into compost. Grass clippings need to be added cautiously and with care – not too many at one time and make sure they’re always mixed in with paper stuff.
As you can see from my photos, I use a variety of different bins and have made compost heaps in the past. Bins are good as they allow the material to be contained in one place, and I can also vary the contents to produce different sorts of compost. I have bins which are just grass and card, bins which are slower working and bins which are making very fast, fairly coarse compost for mulching. BUT I have lots of space and a professional interest in compost! (and am a touch obsessed about compost, I grant you.....)
BUT it doesn't really matter what you make compost in! As long as there is air, water and the right mix of compostable material it will produce compost ...eventually
.JPG)
Getting started
Choose a garden spot where it’s not too sunny but not too shady. Make sure it’s somewhere you can easily add material to the bin and the finished compost can be easily removed. Put the bin on the soil if you can as it yields better results, however your compost bin will still work on concrete. Try to build up a good collection of ‘green’ and ‘brown’ material before starting.
Put a layer of small twigs in the bottom to make an air gap, then add a mix of torn paper and card bits along with peelings and grass clippings. Other green material could be used instead of grass. but make sure you don’t add cooked food waste as it can attract vermin. Then add a layer of damp cardboard bits on the top.
Keep repeating the layers of green stuff (nettles/comfrey/weeds/grass) and brown stuff (card/paper) until the bins are full to the brim. The green items contain bacteria which will generate the initial heat that is required by the process. A healthy compost bin is a living ecosystem. By keeping a good mix of green and brown material you will provide the perfect conditions for a variety of fungi, insects and bacteria and can let them get on with all the hard work for you.
‘Hot’ composting method
Within a few days, especially in the summer, the material in the bin will get hot – maybe upwards of 60 degrees due to fast-acting heat generating microbes. When it begins to cool down, ‘turning’ the heap can speed things up again. Remove everything from the container and mix the contents up, trying to get the outside to the inside. Add water if it is dry, or dry material if it is soggy. Replace the mixture in the bin and add more material when available. The contents should heat up again; the new supply of air allows the microbes to continue with their work. This ‘turning’ can be done several more times, but when the material no longer heats up again, leave it undisturbed to finish composting. A ‘hot’ composting bin should kill most weed seeds present.
‘Cool’ composting method
If you don’t have a lot of material to add to the bin at any one time, don’t worry as it will still produce compost. Adding small quantities of material over a longer period of time without ‘turning’ works just as well but takes longer and may not kill all seeds. When the container is full, stop adding any more as you’ll have to either just leave it to finish composting, which could take up to a year, or turn it to get more air in and make the heat-generating microbes start to work again.
Whichever method you use, make sure that the contents of the bin are moist and add water as necessary. A sign that it is too dry are ants in the mixture. If it’s too wet, just cover to keep off the rain or use the lid provided.
If this process is done correctly you don't actually NEED to do any digging out and mixing up (referred to as "turning" in compost speak) to get good compost. The turning process is there to get more air in to your compost material to aid the aerobic (air loving) bacteria in doing their job; but IF you have built the bin correctly, there will be air pockets in it still! you can turn it if you like and it WILL speed things up, but it shouldn't be actually required.
Using this method, in spring and summer I can make acceptable compost in 8 weeks or so, but that is quite fast. Finished compost is best left for a month or two to ‘mature’ before it is used, as it is too biologically active to apply to plants straight away. Don’t worry if the compost is not ready and crumbly. Even if it’s lumpy or sticky with bits of twig and eggshell in it, it is still usable and can always be sieved before using.
Obviously, if you have room, more than one bin is a good idea, and you can keep one in use, whilst the other one is full of ‘maturing’ compost.
Happy composting!
Subscribe to:
Posts (Atom)