Hello and welcome to The Compost Bin. I'm Compostwoman and I live with my family in rural Herefordshire. We have nearly four acres of garden and woodland, all managed organically and to Permaculture principles, which we share with Chickens, Cats and assorted wildlife. We also grow a lot of our own food, run courses in all sorts of things and make a lot of compost!

I am a Master Composter and have spent more than a decade as a volunteer Community Compost adviser with Garden Organic and my local Council.
I'm a self employed Environmental Educator so I run workshops and events where I talk about compost, veg growing, chicken keeping, cooking, preserving and sustainable living. I also run crafts workshops and Forest School/outdoor play sessions in our wood.

We try to live a more self sufficient lifestyle here, as best we can, while still having a comfortable life and lots of fun.


To learn more about us click on the About Compostwoman tab and remember to click on the photos to make them full size!


Thursday, 31 March 2011

In the last week of March have ...

Felled a privet and a lilac ( well coppiced them) and cleared out 2 more flower beds of all the old stuff from last year

Moved a load of partially composted leaves into one bin and spread the leaf mold at the bottom of the other two bins onto a raised bed.

Cleaned out the hens and also dug over another raised bed.

Planted out broad bean plants and shallots.


Planted up a couple of pots with broad bean plants for an earlier crop. Also planted nasturtiums in the pots, as a blackfly deterrent.

Sowed Nasturtium, Poached egg, sunflower, assorted herbs and salad seeds into pots, trays etc.

Repotted the overwintering herb collections - I have parseley, sage, rosemary and thyme in one big pot , sweet marjoram, origano, lemon thyme and garlic chives in another and regrowth has started, so I tidied them up and gave a top dressing of worm compost.

Potted on some more tomato seedlings into bigger pots,

Sowed some spinach and chard seeds for later transplanting.


Shredded a load more of the tree twiggery and filled a fourth compost bin with the shredded tree, dug over another raised bed and raked it ready to plant into, emptied out some pots and planted them up with lavender bushes and also planted up more pots with strawberry plants from the runners I potted on last autimn.

I also raked out three of the large flower beds and they looks lovely and tidy now.

And we felled a few more trees and sawed and stacked the logs.


Dug out a compost bin and separated out the finished compost.

Raked over another flower bed and wheelbarreled away the dead stuff.

Cut down several shrubs which had got to triffid size.

Dug another raised bed and added composted rabbit/guinea pig poo and then planted more early spuds


Compostman dug out a brick surround raised bed by the back door which was originally a herb box but has been invaded by geums so it all needed digging out.

I am going to make an annual/wildflower bed there with herbs in pots at the door end of the bed. That will help the bees!

MOWED the grass!! and composted it.

Planted out more shallots and prepared the onion bed.

Tidied up the polytunnel and took more tomato plants outside into the cold frame in there.

And then I had a rest....!


Thursday, 17 March 2011

Today I have .....pricked out many, many tomato plants - they are about 6 inches high and I have now got 6 plants of each variety in a multi cell cell and another 4 in individual pots.

I have grown;

Pink Cherry, Red Cherry, Aunty Madge, Gardeners Delight (Cherry)

Costoluto Fiorentino, Costoluto Genovese, Big Boy, Beefsteak, Black Russian, Amiee stuffing, Carlton (Beef)

Shirley, Moneymaker, Latah, Roma, Golden Sunrise, Yellow Perfection,

plus a few others I can't remember now...

I have about 170 plants all growing well, some in the cold frame in side the polytunnel ( those are mine!) and some in the porch conservatory ( which I will sell or give away.)

Have similar quantities of peppers, have grown Californian Wonder, Nardullo, Marconi Rosso, Romano and Hot Cayenne chilli.

We use a lot of tomatoes and now I dehydrate most of them we don't have the space storage issues in the freezers which we used to have to deal with.

These photos were taken 2 weeks ago when the seedlings were just over 2 weeks old.


Wednesday, 16 March 2011

Master Gardener training

I spent the weekend (Sat and Sun) at Garden Organic , Ryton, doing Master Gardener training.

Master Gardeners have the important – and exciting role of supporting people and communities grow their own. To offer them reasons to grow food, remove barriers against, teach growing skills, and offer support. They believe everyone can grow food, whether in a garden or allotment, or on their windowsill or communal land. Whatever the crop; whatever the space. Food growing is important for a healthy diet and lifestyle, saving money, learning skills, and bringing communities together.

Much like my Master Composter role, but this involves being a community gardening, rather than community composting  advisor, so I am helping people to grow veg who need a bit of support to " get going". It could be they are a first time grower, or someone who grows some veg but needs a bit of advice and support to grow more...

We cater for all groups, each supported by a local co-ordinator who gets to know their skills and preferences. Some love doing presentations, for example, other hate them and prefer writing articles. Some engage with schools; others their tower-block neighbours.

I am part of a pilot Master Gardener scheme for Herefordshire: I am the only one at the moment but hopefully many more will follow in my footsteps in the future!

Training from Garden Organic staff was excellent, as always. Support, advice, instruction and information was really good and very informative. The food was wonderful , as well!!


 Philip giving a workshop on seed planting

 Andy the Head Gardener taking us on a tour of the wonderful Garden Organic Ryton site


I aspire to garden like this!  But as there is only Compostman and I to do all the work, I think it is an aspiration, only :-) But I can dream.....

Thursday, 10 March 2011

Early Potatoes in grow sacks.


So, you want to grow potatoes but have no space...so what do you do?

You grow spuds in bags or pots, thats what!

To get an earlier crop of yummy new potatos I planted these in Feb, on a waning moon. If you have a sheltered place you will get an earlier crop by doing this, up to 4 weeks earlier. Mmmmm new potatoes and butter


Take the potato bag ( could be an old compost bag, it does not have to be a special potato growing bag - as long as it excludes the light it will work!)
  and place a layer of drainage material such as small stones on the bottom of the bag. Place the bag where it will grow until harvesting the potatoes , as you do not want to move it around once you have planted the bag with seed potatoes and growing medium ( it will be heavy and moving the bag will not be of benefit to the growing spuds)

 Add around 15 cm of good quality peat free growing medium. On top of this layer place 4 seed potatoes, equally spaced out and around 15cm from the edge of the bag


Add another 10 cm layer of good quality growing medium. You can then add  another 2 or 3 seed potatoes on top of this layer, if you wish. If you do, cover them with another 10 cm of growing medium.

• Place the potato bag in sheltered sunny spot and as the green shoots emerge cover with more growing medium to hide the tips of the shoots, until the bag is filled to the top and the potatoe foliage grows out of the top of the bag.

• Make sure there is a always a good covering of soil on the top of growing tubers, as daylight turns the potatoes green, and they are then poisonous and must NOT be eaten.
• If you want your potatoes to have enough space to grow to a decent size don’t plant more than 5 potatoes per bag
• On cold nights cover the bag with some protective fleece to prevent frost damage. I grow my very early potatoes inside my Polytunnel.
• Water well – around a gallon of water per plant per day is recommended when the full foliage is present.
• When the tops of the plants begin to grow, use canes to support them.
• When flower buds begin to appear it is a sign that the tubers are starting to swell.You might want to use some comfrey fertiliser or other organic treatment to nourish the growing tubers at this stage.
• Harvest after around 10 – 12 weeks.

This method also works for all other potatoes later in the season.

Eat fresh and enjoy!


Saturday, 5 March 2011

Twig stars

Dogwood (Cornus alba) comes in both red and green stemmed versions which make an outstanding display in the winter. The green leaves turn red or orange in autumn before falling and displaying the brightly coloured bare stems. Dogwood bends very easily and the bright colour and straightness of the twigs makes it useful in crafts, especially for making wreaths and baskets. I use it in my craft workshops to make wreath bases at Christmas and to make twig stars, wands and heart shapes at any time of the year. Willow is also a good choice of material.

How to make twig stars or star wands

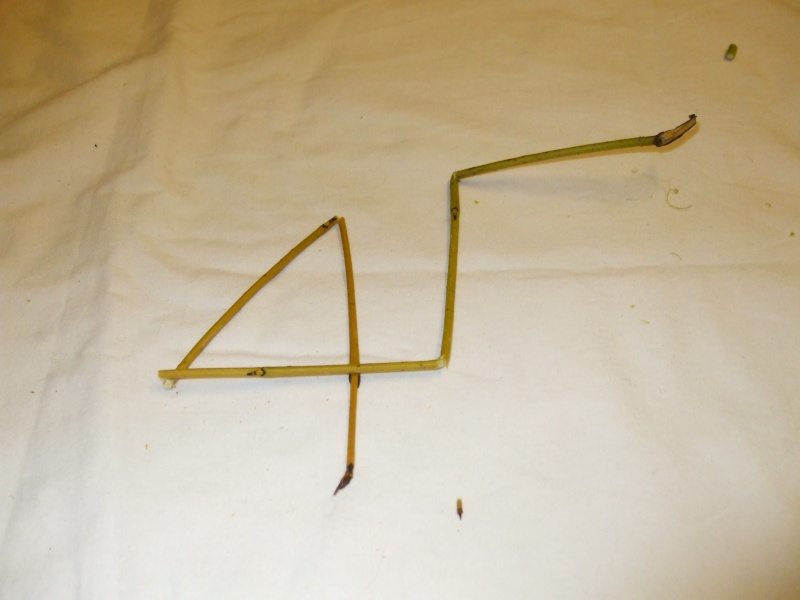
1. Take a straight flexible twig and, working back from the tip, bend the twig about 15cm from the end. Then go back along the twig from this bend about 10 cm and bend it again.

2. Repeat measuring 10 cm backwards towards the thicker end and bending the twig 2 more times. Take care that the twig doesn’t snap while you work.

3. You should now have a twig divided up into 4 equal lengths and one slightly longer length at the very thinnest end.

4. Make a “4” shape with the first bends.


5. Fold the rest of the bent twig back across the “four” to make a 5-pointed star.


Weave the fine end in and out to create the star structure. Wind the fine end around the thicker stem and tie together with raffia or ribbon.


6. If you can find a really long straight twig, make the star at the thinner end and you will have made a wand!


_________________
UA-40361266-1